Personal Knowledge Management (or PKM) is such a useful and vital skill in today’s modern world, and I’m certainly not the first person to centralize the things I do want to track in one convenient, easy-to-navigate place. Of course, I don’t happen to focus everything into the second brain I’ve created (that’s why I also carry a bujo), but my second brain does do what I delegate to it well.
I also discussed previously that I prefer Obsidian out of the many potential second brain apps out there. Notion seems nice and all (and it has a lot of little quality of life features I wouldn’t mind seeing in Obsidian like synchronizing with other apps), and I do know that Roam Research and a few other apps are seen as great alternatives as well, but Obsidian is my winner and I don’t see myself ever switching away from it.
The reason I love Obsidian so much is for much of the same reason I love using Scrivener for writing my novels and other creative works: Both apps are extensible and powerful, but they also don’t railroad you into a specific workflow. Rather, the apps are so open-ended and usable in their state that you can curate your own way of using it. The result is an app that feels so natural to use that it transcends into an incredible experience.
Obsidian truly is other-worldly, so how can someone who’s a beginner take their experience to the next level?
I introduce to you my Obsidian setup:

Aside from how abstract it feels to see this screenshot within a screenshot within my Obsidian setup as I draft this post, I can almost anticipate what many would think upon seeing it.
- Where are the panes?
- How do you access your notes and files within the app?
- How do you even do anything with that setup?
- Do you have a series of keyboard shortcuts that go with it?
- Is it really much better than a default setup or some other configuration?
- Forget the Obsidian setup! What I want to know is what kind of desktop is that?
- Of course you have it in the Nord color scheme.
And in order, this is how I address those thoughts.
- I can toggle the panes with keyboard shortcuts I’ve set up.
- I can access existing files with a keyboard shortcut as well.
- It is very easy to do things in the app once you get the hang of it.
- Yes, the keyboard shortcuts make Obsidian obscenely good.
- I like it better than default, but whether or not you find it better than a different setup going around is entirely up to you to judge.
- Desktop setup may be in a future blog post.
- You know I love the Nord color scheme.
Where Can I Get Obsidian?
You can grab it here for free. Seriously. The only thing that costs anything is syncing with their servers, but I love the app so much that I find this a perfectly fair trade-off to support the developers.
For Windows and macOS users, it’s as straightforward to install as you would think. Just download a file and click on it to do what you normally would.
For Linux, you have the choice of AppImage, Snap, or Flatpak. Personally, I have had no issues whatsoever with the Flatpak version, and it remains my go-to on my Arch desktop and Fedora workstation.
flatpak install flathub md.obsidian.ObsidianWhat Plugins To Use?
First off, we’ll have access to a handful of core plugins by default, but the community plugins will truly make Obsidian shine. To get started accessing them, hit Ctrl + , (get used to seeing shortcuts here!) and take a look at the pane where it lists your options. You should have no trouble at all finding the plugins.

See which ones you want to enable. I admit there are a few I didn’t even know were there (such as Publish, which I just barely discovered and enabled as I wrote this), and I did disable a couple that outlived their usefulness (I stopped using Daily notes several months ago).
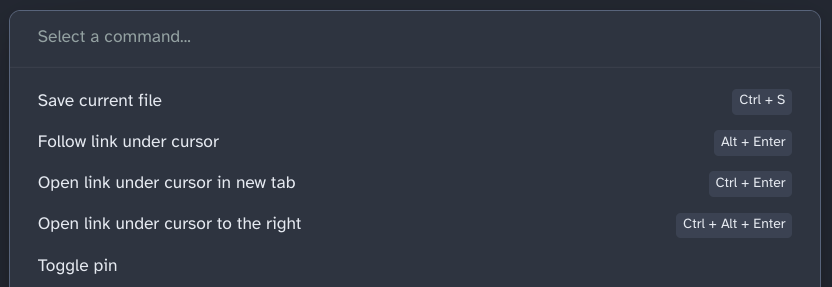
I’ll let you decide what to enable, but if there are two must-use core plugins I recommend, it’s these two: Command palette and Quick switcher. Both will let you open a prompt with a keyboard shortcut (Ctrl + P and Ctrl + O, respectively). Also, if you subscribe to using Obsidian as a Second Brain (especially with the PARA system), I would generally recommend also enabling Files.
Now we have community plugins just beneath that. There are so many you can go out and try, but to do that, you must first disable restricted mode.
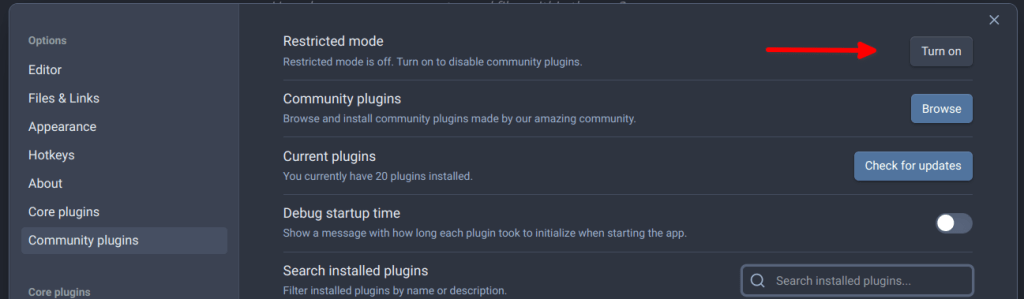
You can then use the button just beneath that to take a look at the amazing world of community plugins. There are even more overall, but here are the ones I generally use:
- Advanced Tables
- Annotator
- Banners
- Better Word Count
- Cycle through Panes
- Emoji Toolbar (yes, even I want to insert emojis now and then)
- Hider
- Homepage (this is a big one for me)
- Icon Folder
- Minimal Theme Settings (I’ll explain this one in a bit)
- Paste URL into selection
- Quick Latex for Obsidian
- Style Settings
- Underline (when BOLD and Italic just aren’t enough)
Don’t Forget the Editor Options
Head to the top of the settings menu where it says “Editor.” We can toggle even more settings on what our experience is like when we edit our notes. This is where I enable “Show line number” and especially “Vim key bindings.”
The Sheer Power of Vim Key Bindings
If you haven’t used Vim, this isn’t something to take too lightly, which is why you’ll see a warning asking if you’re sure you know what you’re doing. Even after confirming, Obsidian will then ask you what command to enter in order to close a Vim document without making any changes.

I already use Vim on my systems and usually feel a bit like a novice, but I had even more incentive to learn more features and Vim bindings thanks to having them work within Obsidian. I got myself up and running faster by watching this video. It’s almost 30 minutes, but I highly recommend it if you really want to take your Obsidian experience to the next level with keyboard shortcuts.
Appearance Options
Click on “Appearance” next and hit Manage to start browsing for themes. Personally, Minimal is my all-time favorite, and that is also why I suggested installing Minimal Theme Settings as well. Once you have Minimal enabled, go to Minimal Theme Settings in your community plugins and select the color scheme you want to use.
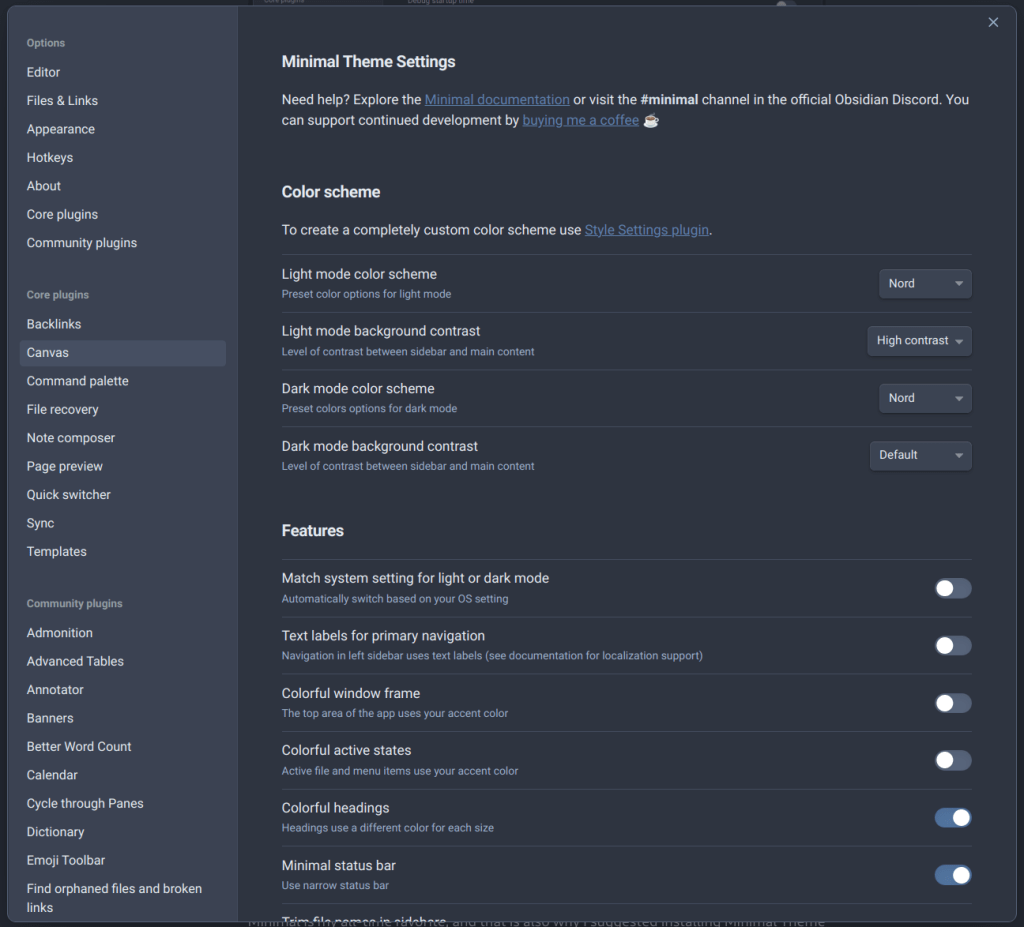
Besides Nord, you can select other popular color schemes like Dracula, Gruvbox, and many more. Gruvbox in particular is a treat to use around autumn.
I even went the extra mile and used Style Settings to tweak and change individual colors for the headers to better match the color scheme. I referenced the color swatches on the Nord Theme website under Aurora to give my headers a splash of color.

Yes, Style Settings actually lets you tweak individual fonts for your headers. There’s so much it lets you do!
Additional Shortcuts
I can’t wrap up this glimpse of my power user setup without delving into what additional keyboard shortcuts I have set up. To change them up or see what you generally have to work with out of the box, simply hit Ctrl + , and give the “Hotkeys” section a glance. Here’s what I normally use.
| Shortcut | Action |
|---|---|
| Alt + Shift + L | Toggle left pane |
| Alt + Shift + U | Toggle right pane* |
| Alt + Z | Insert shoutout box |
| Ctrl + N | Create New Note |
| Ctrl + O | Open Note |
| Ctrl + P | Open command palette |
| Ctrl + Shift + H | Toggle highlight |
| Ctrl + U | Toggle underline |
Granted, there are more things I could do with shortcuts alone, but the command palette lets me access several more. For instance, that lets me insert templates, insert emojis, split my view between different notes, and much more. Even something as innocuous as Ctrl + O gives me an additional option to open up existing notes in a new pane.
Just Scratching The Surface
I feel like I could go on and on about other aspects of Obsidian. I could detail how I use Hider to make my interface feel more minimal, I could delve into how I manage tables using the Advanced Tables plugin (I use this plugin so much more than I ever would have expected), and I could even discuss how I incorporate banners into a few pages I have, but I feel this is an appropriate enough first look at my power user setup on Obsidian.
Have you or do you use Obsidian? If so, how much do you use it? Do you think a different workflow or setup would help you be more productive with it or not? Conversely, do you use a different app in place of Obsidian?

3 responses to “Pretty, Powerful, Productive: My Obsidian Power User Setup”
[…] integrations, even back when I used Todoist for a brief stint before starting this site. In fact, as an Obsidian user, I still can’t see myself using so much as that integration feature either. It’s partly […]
LikeLike
[…] had used Obsidian via Flatpak for years now. No issues ever. However, that eventually changed. One day, Obsidian […]
LikeLike
[…] while some of these, setups, tasks, and workflows, I admit, can be a little fun, it’s ultimately time I could otherwise spend on actually learning, reading, and taking more […]
LikeLike