
I’ve been a rather busy bee this past month and a half. I already alluded to the fact a while back, but I recently got Jellyfin running on an otherwise neglected Mac mini. I was able to set up a domain to redirect to it and everything, allowing me to replace both TIDAL and just about any video streaming service I could think of in one fell swoop.
But at some point, I thought more about my girlfriend. While we both mostly live off my income, she’s always been more thrifty, wanting us to not only spend less on what we don’t need, but to save for our future together. The idea means a lot to her, and after running Jellyfin for the past couple of months for streaming entertainment needs, it occurred to me:
Why don’t I try to save more money with this server by replacing expensive subscription services?
Initial Inspiration to Start
Like some of my interesting ideas, I was inspired to look into this once the YouTube algorithm recommended this to me:
From there, I really started to look more into the idea, watching more videos on the topic. After my girlfriend and I moved last year, I was able to get us a much better quality internet connection. Maybe the idea of hosting my own server wasn’t unfeasible anymore.
Considering where I am now, I find it somewhat ironic considering the videos I’ve seen on homelabbing from YouTube. Many of them showcase cool setups, racks, accessories, additional drives, RAID arrays, and so on. As expected, many of them add up in price to pull off. Some of these videos I’ve checked out feature the YouTubers claiming they’ve spent hundreds, if not, thousands more on their homelab setups, their homelab “addiction,” if you will.
Despite all of that, this was just about me trying to get more mileage out of an otherwise neglected Mac mini my friend loaned and eventually gave me. I actually was close to selling it a few times in the past, but now? I am extremely thankful that I chose to hold onto it and let it sit neglected in a storage bin until this moment.
The reason I find this ironic is the YouTube videos recommended to me on the subject are mostly from people who discovered the hobby on a casual level before they began overspending in hopes of chasing the ultimate setup. They started looking for more processing power, more storage, more access. They even concocted interesting ways to set up the server in a neat little storage closet or whatever.
That wasn’t the case at all for me, as I just found something I would have otherwise sold and decided to repurpose it to save a bit of money. I do, however, thank the YouTubers who showed me what was even possible to accomplish in the first place, making me aware that I could do this myself.
The Seed of Jellyfin

I wanted to keep things simple with Jellyfin first, and I was surprised at how well it worked when I first attempted to set it up. Sure, setting up a domain was a little tough initially, but it was possible. Just like my other attempts in the past to try and be a sysadmin, it felt like I did manage to pull it off, but just barely.
Eventually, I did spend a bit of extra money, however. I know I went on about how some people in this hobby overspend on upgrades, but the only real upgrade I bothered with was an ethernet switch. I prefer an actual cable instead of having to rely on wifi. I just got a simple one to plug in my home office, and I plugged both my Arch Linux machine and Mac mini server into it. Simple enough.
After that, I followed some simple instructions that largely boiled down to:
- Install Jellyfin on the Mac mini.
- Set up my media library.
- Configure my domain of choice.
- Enjoy my music and videos wherever and whenever.
That was it for a while too. While I would rather not delve into where I get shows and movies from (*cough*), it was nice to have full control of my media in this way. I would only have the shows and films I was interested in watching with nothing I didn’t care for. Additionally, I wouldn’t have to deal with broken recommendations or a bad algorithm trying to railroad me into overhyped, new content for an audience that doesn’t share my taste.
I eventually discovered that Jellyfin was rather extensible as well, prompting me to change the default theme for it and get a few add-ons. (Adding an “Skip Intro” button was a serious game-changer for me!) To make Jellyfin all the sweeter to use, it’s compatible with various third-party apps that are compatible with your Jellyfin server as well. There are several apps that I plan to compare with one another in the near future in order to see which ones are worth using and which aren’t.
But despite now owning an iPod, it’s still convenient to connect to my Jellyfin server from my phone, especially for workouts where I’d prefer to not risk damaging my actual iPod. Turns out that I love using my iPod mostly around the house at this point, and I only tend to gravitate to a handful of playlists with relatively relaxing music.
But after nearly two months of using Jellyfin as a server (mostly for video), I thought in passing here or there about if it would be possible to do more with my home server, the Mac mini.
What Else to Save On?

The thought crossed my mind over how I could make my girlfriend happy by canceling a few services and saving more in the long run. I did have it on the back of my mind, as work usually caught most of my attention on a regular basis, but if I had to install more on this server, what would it be?
The inspiration hit me only earlier this month, in September, as I paid my Digital Ocean server costs for my Nextcloud server. Let me put this into perspective:
Years ago, I went from paying a close to $20 a month for Dropbox to $5 extra for Digital Ocean to host Nextcloud for me. I would make myself feel better at times knowing that Nextcloud did a lot more than Dropbox could with its extensibility and apps. Over time, I found Nextcloud’s drop-in replacements for Google services less convenient or useful. Trying to sync my contacts and calendar was, honestly, a pain compared to dealing with Google looking at my contacts and calendar.
Still, that’s a different topic altogether. Regardless, I sat down to crunch the numbers just a few days ago to realize that I was spending a lot each year on Digital Ocean’s hosting. What if, I thought, I could save all of that money by hosting my own Nextcloud instance?
Naturally, I had to do a little initial research on this, and I discovered I could use this thing called Docker to build and run self-hosted apps relatively easily on a server. I had a passing idea of what it was capable of. I even remembered my last attempt to use it a few years ago while having little idea what I was doing as I tried to install ONLYOFFICE integration on my Digital Ocean droplet. The setup was poor and required setting up a secondary server just to run it. It was excessive and ramped up my hosting cost so much that I deleted the setup after two months. But now that I had some idea what I was doing, I thought, I could try to use Docker again to install Nextcloud on the Mac mini.
While I was at it, I took a look at my budget on YNAB to see how much I would be saving in the long run, but something else hit me right then and there: Could I host an alternative to YNAB and save over $100 a year, too?
I did some research and settled on using Actual Server to replace YNAB, mostly because their documentation included resources on how to migrate from YNAB to Actual. It seemed perfect for my needs, so I decided that would be another app to set up on this server. I was going to turn this Mac mini into my greatest reclamation project, having it save me hundreds a year!
The Initial Snag

There was just one big problem for me that prevented me from getting started.
Docker only supports the two most recent releases of macOS, and the Mac mini I was running could only go up to Monterey. Hooray for arbitrary upgrade requirements. If I wanted to make this happen, I had two options:
- OPTION 1: Erase the Mac mini’s installation of Monterey and start fresh with a Linux distro, or
- OPTION 2: Find a way to upgrade Monterey to a later version unofficially.
While installing Linux seemed like a no-brainer for a Linux nerd like myself, I admit that I balked at the idea of installing and setting up Jellyfin from scratch all over again. I had a setup and plugins I already was quite happy with; I didn’t want to wipe the slate clean and do all of that again. While I know there’s such a thing as migrating a server and setup, that seemed too inconvenient for me.
Consequently, I chose option 2. Thankfully, unlike my frustrating, multiple days’ long attempts to upgrade the black MacBook Core 2 Duo laptop to Mountain Lion, upgrading this Mac mini to a later version of macOS was extremely easy thanks to OpenCore Legacy Patcher, which has support that actually exists unlike Mac Post Facto.
I used the opportunity to upgrade straight to Sonoma with a spare USB drive I had lying around. Thankfully, this upgrade process presented just about no real issues to speak of. The inconvenience was the sheer amount of time for the upgrade to eventually finish, sure, but everything was working fine after that.
With that big snag out of the way, I was able to set up and configure Docker for the first time!
Docker Setup

Honestly, this part was massively easy to the point where I don’t have a whole lot to write about. All I had to do was run the Docker GUI program, search for images I wanted to pull and run, and do just that. I pulled Nextcloud and had it running on my localhost before I knew it. To make things even more surprising, Actual Budget was even easier to get up and running than Nextcloud!
If anything, the only real obstacle was trying to delegate my existing domain and set up its DNS to work with https and use my server apps from here on out. I decided to repurpose my old domain from my Digital Ocean Nextcloud instance. However, I opted to use the following subdomains this time around like so:
- nextcloud.example.com for Nextcloud
- jellyfin.example.com for Jellyfin
- actual.example.com for Actual Budget
Getting the DNS and SSL to work on my end was the toughest part, but once I finally figured it all out and got it to work, everything was smooth sailing from there.
The worst part was getting the SSL certificate to issue, which took several hours of waiting on my end, as these DNS changes and whatnot apparently take several hours to propagate. There were also several steps where I had no idea what to do, but thankfully for me, Docker built an AI chat assistant into their GUI app. Whenever I reached an impasse, all I had to do was explain my issue to “Gordon,” as the AI is named. Then Gordon would give me a breakdown of what was going on along with suggested actions to help. Compared to the likes of ChatGPT, I would go as far as saying that Gordon was possibly more helpful than ChatGPT with this sort of matter. While ChatGPT would give me some outdated or vague instructions at times, Gordon was more knowledgeable.

In fact, when I had to update a config.php file in Nextcloud, Gordon explained what I had to do. I lacked the confidence to format the file myself, as I’m not really a coder. I had also heard in passing that PHP was notoriously finicky to work with, too.
That said, I was able to copy-paste my entire config.php file into Gordon and ask if it could append the changes in for me. That way, I could avoid making a serious mistake. Gordon happily generated the file with requested changes, ready to copy and paste. I was good to go, and my Nextcloud was up and running before I knew it. Gordon was also able to help me with port issues once my Actual Budget image failed to start as well. All in all, I have to say Gordon is extremely useful within Docker.
How Much I’m Saving?
Now that I set up these three self-hosted apps on my domain, how much am I saving on average compared to running these services through their mainstream subscriptions?
To calculate, I asked ChatGPT to break things down based on the information I gave it:
- Switching to Jellyfin from TIDAL saved me $11.90 a month. That’s $142.80 a year.
- Switching to Actual from YNAB saved me $104.58 a year (after taxes and my YNAB4 discount).
- Switching to locally-hosted Nextcloud from Digital Ocean’s hosting saved me roughly $25 a month, give or take a few dollars each month. Assuming it’s always $25, that’s $300 a year.
- Switching to Jellyfin from a video streaming service like Netflix, assuming I used standard and ad-free streaming, would be another $15.49 a month. That’s $185.88 a year.
Had I been using something else like HBO Max, Hulu, Disney+, or just about anything else, the ballpark is estimated to be between $12 to $18 a month, which is roughly $144 a year for best case scenario. For the upper-end of pricing, that’s $216 a year just for video streaming. That’s also assuming I only used ONE paid video streaming service. Imagine if I had two or more video streaming subscriptions, my wallet being siphoned dry every month.
Not factoring in other things such as electricity (having a plan with free power at night sure is great), I’m saving the amounts listed below as follows:
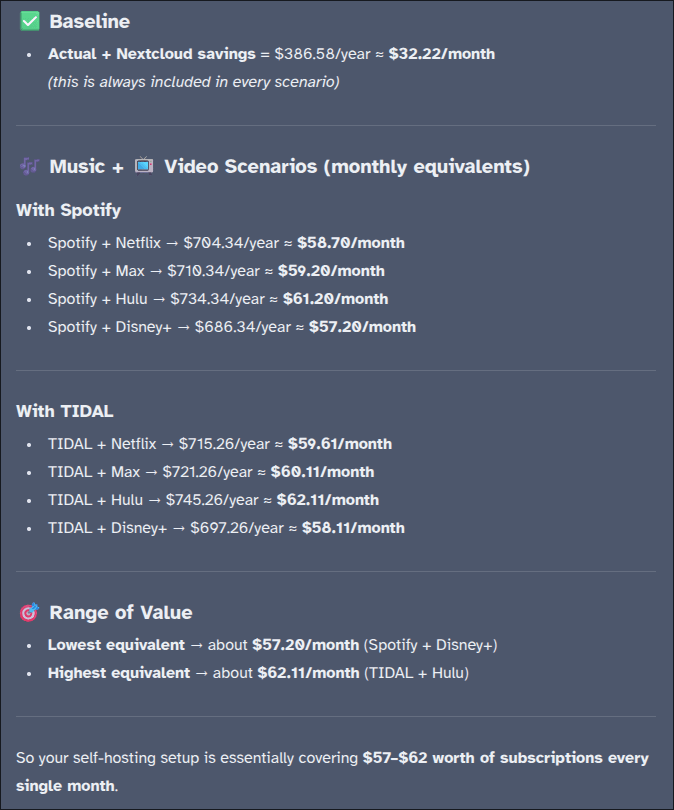
I’m aware that I haven’t used Spotify in ages now, and I didn’t have any subscriptions to Netflix or the other video streaming services to begin with. I mostly wanted to see how much I was saving compared to if I had these services. Despite that, I am also aware that some of the prices ChatGPT fetched for me may not be 100% updated or accurate (I’m very used to ChatGPT being wrong every now and then), but I still found this pricing breakdown enlightening as a whole.
What Else?
There are a few other details I didn’t really bring up. For instance, I had to do quite a bit of additional configuration on Nextcloud. It didn’t even support standard 2FA out of the box and required me to install some add-ons to enable it. Once I had both of my Yubikeys set up, I felt much more at ease. Then there was how Actual Budget only greeted me with a password prompt… just the password. No support for usernames or anything. I looked into what to do about this and found a security measure that I’m much happier with now, and then I applied that exact same fix to my Jellyfin setup.
I know there’s probably more I can do; I’ll look more into that in the future. For now, however, I’ve started to really like what I have in my server setup.
- I’m using my music streaming whenever it’s practical, whether I’m at work or working out.
- I can stream video to our living room Xbox with it just fine.
- I can budget on the go with just my phone’s browser.
- I’m using Nextcloud just as I did before, minus paying over $20 a month.
I’ve been exploring more possible options of what else I could run on this capable Mac mini, but I feel like this capable little device is poised to save me so much in costs that would otherwise go to paying subscriptions.

I have toyed around with the idea of running a few other apps on the server, like maybe something for my unlocked audiobooks, or perhaps a service for my eBooks? Still, I haven’t used Audible in a while, so I’m not really saving money there, and I already have an eInk reader (not a Kindle).
Regardless, the current setup still means more money in our pockets. I did cancel Obsidian sync after paying for it for a few years, and I did consider setting up Syncthing just for the functionality. I might get around to that once my annual subscription expires in a few more weeks.
Until then, something else that pleases me about this server setup is how I used to think I couldn’t do this a few years ago. Whether it was my circumstances (no hardware to use, slow internet plan) or my lack of confidence, I am glad that everything finally came into place, that I was able to actually make this happen. All I need to do now is keep using the server and watch as my wallet grows fatter each month.
I would recommend others with the capability to give it a try. It can be fun to set up and configure a server setup for a lot of the same reasons Linux is, and you would have so much to gain.
Have you considered homelabbing yourself? Or do you already have a homelab setup yourself? What are some use cases that your setup covers? Do you have any possible tips for my admittedly minimal setup, where I can go from here? (I have no trouble admitting I’m still pretty new to this whole thing.) Feel free to share them in the comments below.

5 responses to “How Homelabbing is Saving Me Hundreds of Dollars a Year”
I am in the process of doing this myself to host my own code repositories. First thing anyway, I am going to likely add a number of services. I bought a HP ProDesk 600 G2 DM Micro PC for $50 after sales and a little Newegg credits I had kicking around. It’s not super powerful as a quad core i5 but it does have 16gb of ram.
Most likely I will install either arch or nix since they can be easily repeatable deployments. Then run a lightweight version of Kubernetes which will make it easier to just add more compute by adding another computer to the cluster. Initially it will just run Gitea and actions but I might even host my blog on it since it’s just a static site with a single function to handle form submissions.
LikeLiked by 1 person
[…] Calendar and Google Contacts at this time, I still recognize when an added inconvenience is, like saving hundreds of dollars a year with a streaming server to replace Spotify and Netflix. I’ll have to go through the effort of organizing the shows, movies, and music, but […]
LikeLike
[…] brain and bullet journal coexist in harmony. But even after setting up Syncthing a month ago on my personal server just to sync my second brain vault, I’m ready to finally admit […]
LikeLike
[…] everything related to my technology, whether that’s my current Linux setup, commands to know, my server setup, older computers I tinker with, and my video game […]
LikeLike
[…] back in the day. I gave it a fair shake a few times and used it for casual browsing on what is now my Mac mini server. Still, I eventually found myself missing Vivaldi too much and switched back before I knew […]
LikeLike